
Showing posts with label smoking. Show all posts
Showing posts with label smoking. Show all posts
16 February 2012
13 February 2012
Pork Belly
After an initial experiment with pork belly-to-bacon that went good-not-great, I was determined to learn my lessons and treat that most excellent of meats with the care it deserves. This was not simple, but it was totally worth it.
Procedure
Verdict
Well, just amazing. Really.
Procedure
- Take pork belly, wash and pat dry
- Put belly in a brine - I won't go over it again here, but a basic not-too-salty brine is recommended (bourbon and maple don't hurt - I added onion powder and fried garlic to this one [with excellent results]) - and put in the fridge for five days to a week. Either a sealed Ziploc or airtight tupperware will do.
- When ready to smoke, remove from brine, rinse and pat dry.
- Smoke for three hours; remove and let cool.
- At this point it makes a great bacon (I used one for this purpose), but there's also a highly recommended second step.
- Heat oven to 250 degrees.
- Put pork belly in covered Dutch oven or Pyrex container, and cover with either pork stock or water (if, for some reason, you don't have pork stock - which you should)
- Let simmer in oven for three hours
- Remove from oven and set pork belly aside; reserve stock either for later or add to simmering broth for ramen or other soup. Not surprisingly, it adds a deliciously smoky, creamy wondrousness to any soup.
- When soup is ready - or maybe a pork bun, or really anything - heat a cast iron skillet to medium-high. Don't be shy!
- Drop the belly in the pan with tongs and spatula at the ready to prevent from sticking. It will sizzle something wonderful.
- Cook for about a minute on each side to crisp up the belly proper
- Set aside, slice and serve with soup or direct application to mouth.
- Enjoy!
Verdict
Well, just amazing. Really.
04 September 2011
Smokeout Menu - 3 September 2011
Long time no blog!
In commemoration of tomorrow's smoke-out, I'll actually be making an effort to document what gets made. Some old favorites, some new jacks – should be a grand old time.
Tired of spending $3 a pack on rolls, and with enough experience and confidence in my bread making, I decided to actually make the rolls this time. I'd just started a batch of the Sullivan Street no-knead bread and found a roll recipe almost the same, so tripled the ingredients and set up two bowls to rise over the next 18 hours. Via Fabulous and Delicious:
Ingredients
Delicious!
Ingredients
Brine:
• 8 oz. molasses
• 12 oz. pickling salt
• 2 quarts water
• 6-8 lb. Boston butt
Rub:
• 1 Tsp. whole cumin seed
• 1 Tsp. whole fennel seed
• 1 Tsp. whole coriander
• 1 Tbsp. chili powder
• 1 Tbsp. onion powder
• 1 Tbsp. paprika
Procedure


Verdict
Just amazing.
In commemoration of tomorrow's smoke-out, I'll actually be making an effort to document what gets made. Some old favorites, some new jacks – should be a grand old time.
No-Knead Rolls
Tired of spending $3 a pack on rolls, and with enough experience and confidence in my bread making, I decided to actually make the rolls this time. I'd just started a batch of the Sullivan Street no-knead bread and found a roll recipe almost the same, so tripled the ingredients and set up two bowls to rise over the next 18 hours. Via Fabulous and Delicious:
Ingredients
- 1 1/2 C. warm water
- 1/4 Tsp. dry active yeast
- 1 Tbsp. olive oil
- 1 1/4 Tsp. salt
- 1/2 Tsp. sugar
- 3 C. flour
- cornmeal for the baking pans
Procedure
- Add all ingredients (except the cornmeal) to a bowl and mix with a spoon until the ingredients are decently mixed. The dough is going to be very sticky.
- Once mixed, cover the bowl with a towel or saran wrap and let the dough sit for 12 hours. (I've done as little as 8 hours with success.) After the dough has sat for at least 8 hours (ideally 12), it will be bubbly and at least doubled in size.

- Place a generous amount of cornmeal on a baking sheet to keep from sticking while baking.
- To prepare the rolls, place a 1/4-1/2 cup of flour on a plate or counter top.
- Separate the dough into 8 pieces; take each piece of the dough and roll/dust the outside with the flour, then mold the piece of dough into a round shape and place it on the baking sheet.
- Once all the rolls are made and placed on the baking sheet, let them sit for 30 minutes to 1 hour so they may rise some more.
- Place broiler plan in the oven and heat to 425 degrees.
- Bake the rolls on the middle/top rack for 25-30 minutes or until they are golden on the outside and sound hollow when tapped on top.
- Remove from the oven, and let them cool on rack

Delicious!
Pulled Pork
Via Alton Brown, my stand-by recipe. Ingredients
Brine:
• 8 oz. molasses
• 12 oz. pickling salt
• 2 quarts water
• 6-8 lb. Boston butt
Rub:
• 1 Tsp. whole cumin seed
• 1 Tsp. whole fennel seed
• 1 Tsp. whole coriander
• 1 Tbsp. chili powder
• 1 Tbsp. onion powder
• 1 Tbsp. paprika
Procedure
- Combine molasses, pickling salt, and water in large pot
- Add Boston butt making sure it is completely submerged in brine, cover, and let sit in refrigerator for a minimum of 8 hours. 12 hours is ideal.
- Place cumin seed, fennel seed, and coriander in food grinder and grind fine. Transfer to a small mixing bowl and stir in chili powder, onion powder, and paprika.
- Remove Boston butt from brine and pat dry. Sift the rub evenly over the shoulder and then pat onto the meat making sure as much of the rub as possible adheres.
- Place butt in smoker and cook for 12 hours
- Remove from smoker and set aside to rest for at least 1 hour; pull meat apart with 2 forks


Verdict
Just amazing.
Vegan-But-Great Refried Beans
Ingredients
- 2 c. pinto or black beans
- 6 c. veggie stock
- 4 garlic cloves, minced
- 1 medium onion, minced
- 1 poblano (or large jalapeño and small spicy) pepper
- 1 Tsp. ginger powder
- 2 Tsp. tumeric powder
- 1 Tsp. chili powder
- 2 Tsp. salt
- oil
Procedure
- Heat generous amount of oil to medium-high in deep, heavy pan or pot - cast iron is the best, or non-stick
- Add garlic, fry until fragrant and then add onions, and fry until translucent
- Add pepper and combine, stirring until pepper begins to soften
- Add spices and mix together well
- Add beans, mix all together
- Add stock, stir, and raise heat to high; bring to boil
- Keep pot at a low boil for quite a while (at least an hour), adding more water when necessary
- When beans have softened, use a potato masher to pound them to a paste; add more water and oil if necessary to cohere, and lower heat to medium-low
- Continue cooking, stirring, and adding water – having a bit stick to the bottom isn't bad if you can scrape it up and avoid burning
- When it reaches your desired level of consistency, remove from heat and serve with soft corn tortillas
- Enjoy!
Verdict
Delicioso!
24 October 2010
Smoked Fish
By far the most exciting new part of the smoker has been my experiments with fish. Each has been instructive, and mostly delicious. And as good as the mackerel was the other week, this past weekend bluefish provided new highs. Not to be overlooked, however, a nice brine for the tuna delivered superior results – fuller description below.

Background: Bluefish was the cheapest but also tasty-looking at the fishmongers so I decided to give it a go. Good choice.
Preparation:
Verdict: Just great. Best fish so far, and not even expensive – already becoming a household standard.

Background: In addition to the huge filet of bluefish, there was a lonely little hunk of albacore tuna that was the last the fishmongers had today, so I decided to give it another go and am glad I did.
Preparation: The brine I found was a lovely little ginger brine (I went pretty heavy on it):
Verdict: The result is not overly dry, very flavorful and meaty. Looking forward to having some sandwiches this week.
Bluefish

Preparation:
- Prepare brine:
- 4 c. water
- 1/4 c. soy sauce
- 1/4 c. kosher salt
- 1/4 c. sugar
- 4 bay leaves, crushed
- 1 tbs. whole peppercorns
- Dissolve all elements and combine
- Put fish in pan and cover with brine; refrigerate for 4 hours
- Remove, rinse, and put on rack to let drain and dry for 2 hours
- Smoke for 3 hrs. on aluminum foil (less for smaller filets)
- Enjoy!
Verdict: Just great. Best fish so far, and not even expensive – already becoming a household standard.
Albacore Tuna

Background: In addition to the huge filet of bluefish, there was a lonely little hunk of albacore tuna that was the last the fishmongers had today, so I decided to give it another go and am glad I did.
Preparation: The brine I found was a lovely little ginger brine (I went pretty heavy on it):
- Prepare brine:
- 2/3 c. water
- 2" inch piece of ginger, sliced
- 1 tbs. honey
- 1 tbs. balsamic vinegar
- 1/3 cup soy sauce
- Dissolve all elements and combine
- Put fish in plastic bag with brine; chill in fridge for 1 hour
- Remove, rinse, and place on rack to dry and drain for 2 hours
- Smoke for 2 hrs. on aluminum foil
- Enjoy!
Verdict: The result is not overly dry, very flavorful and meaty. Looking forward to having some sandwiches this week.
11 October 2010
Smoking Meat
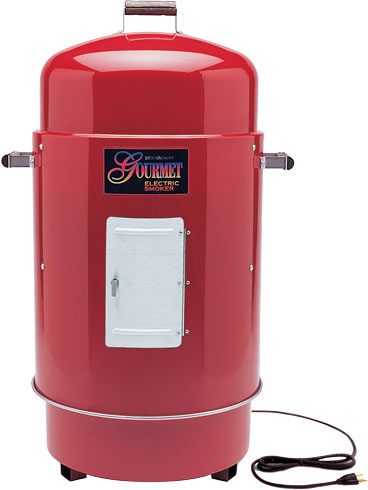
One of my first priorities after moving to Brooklyn (yeah, yeah, we'll see whether the blog title stays put) in a house with a yard was getting myself a smoker. After two years of delicious smokery courtesy the Wolf-Ferrari house, a change of location demanded that I get my own carcinogenic deliciousness up and running. So it was that, for my birthday, I bought myself a Brinkmann Gourmet Electric Smoker– very basic, no temperature gauge or even on/off switch, but electric, two big racks and only $70.

After assembling and curing it, I determined that yesterday would be the first trial-run of the big red beast, and so assembled a range of meats and preparations to see how it all went.
Long story short: super-awesome.
Long story slightly longer: preparations and results for each given meat, below, in order of awesomeness.

Background: I'd had it in my mind to smoke some fish, and so stopped by the fishmongers at the Ft. Greene Farmer's Market on Saturday looking for a likely victim. The lovely, greasy Spanish Mackerel was a perfect prospect, and so I picked up three filets.
Preparation: To start with, I went just with a super-simple fish smoking technique –

Background: Also from the bounty of the Farmer's Market, these big ol' turkey thighs (3+ lbs.' worth) were meant as an experiment in de-boned poultry, and also as fodder for tacos and sandwiches for the week.
Preparation: I went with a (mostly) dry rub for these, made of
After assembling and curing it, I determined that yesterday would be the first trial-run of the big red beast, and so assembled a range of meats and preparations to see how it all went.
Long story short: super-awesome.
Long story slightly longer: preparations and results for each given meat, below, in order of awesomeness.
1) Spanish Mackerel

Background: I'd had it in my mind to smoke some fish, and so stopped by the fishmongers at the Ft. Greene Farmer's Market on Saturday looking for a likely victim. The lovely, greasy Spanish Mackerel was a perfect prospect, and so I picked up three filets.
Preparation: To start with, I went just with a super-simple fish smoking technique –
- Liberally sprinkle kosher salt onto plate
- Place filets on plate
- Liberally sprinkle kosher salt on filets
- Let sit for 10-15 minutes
- Wash off salt with cold water, transfer to dry plate and pat dry
- When ready to smoke, transfer to large sheet of aluminum foil
- Place aluminum foil on grate of smoker, and smoke for ~2 hrs.
- Enjoy!
Verdict: Hot out of the smoker, the mackerel was simply divine – no longer greasy, the fat had kept the fish moist and tender, the smoke providing a lovely counterpoint to the salt and sweetness of the fish. And then today, chunked out and eaten on top of a poppy-seed bagel with cream cheese, the fish was just about as good a bagel-topping as I've ever had. Highly, highly recommended
2) Whole Chicken
Background: No picture, because we demolished the bird entirely. I got a nice, free-range, small (~3 lbs.) bird, because who doesn't love a chicken?
Preparation: Super-basic. Covered in olive oil, salt, pepper, and smoked for four (4) hours right on the grate.
Verdict: It only misses first prize because the mackerel was so transcendent, but this was basically a perfect bird. The skin was a deep golden brown, crispy but not overly so, and the meat inside was just outrageously juicy and tender. I am very, very much looking forward to cooking down this carcass for stock, and to repeat performances smoking birds.
3) (tie) Pepper-rubbed Turkey Thighs

Preparation: I went with a (mostly) dry rub for these, made of
- 1 tbs. chili powder
- 1 tbs. paprika
- 1 tbs. cayenne pepper
- 1 tbs. cumin powder
- 1/2 tbs. cinnamon powder
- 1 tbs. maple whiskey
- 2 tbs. apple cider vinegar
coated them, placed them in a Ziploc, and marinated overnight. Put them on the rack and smoked for four (4) hours as well.
Verdict: Very nice, though room for improvement – maybe more of a marinade and a little oil will help hold more moisture in (not really much in the way of skin on these guys). Great smokiness comes through in the meat, and the rub firmed up nicely into a spicy and flavorful crust all around.
Verdict: Very flavorful, and a great success. Also nice to make ~12 oz. of pâté with ~$3 of ingredients.

3) (tie) Chicken Liver Pâté
Background: After once accidentally discovering how awesome smoked liver is, I've become an enormous fan of this mostly-overlooked-currently-in-this-country-among-some-audiences organ. At least when it comes from birds.
Preparation: Having had great success with making a pâté with sherry after the fact, I decided to go traditional and soak the livers in booze (ha!) the night before –
- Wash 1 lb. livers, and transfer to glass bowl
- Pour four (4) oz. sherry over them, and mix gently
- Cover bowl with plastic wrap, and refrigerate overnight
- When ready to smoke, drain livers in colander (but don't rinse – just let excess liquid off)
- Get a large sheet of aluminum foil (or aluminum pie plate), and create circular ridge
- Place livers in pie plate or foil approximation thereof
- Put container on rack of smoker, and smoke for ~3 hours
- Let cool, and transfer to bowl; mash thoroughly with fork
- Cover, and transfer to fridge
- Serve chilled or room temperature
- Enjoy on bread or crackers!
Verdict: Very flavorful, and a great success. Also nice to make ~12 oz. of pâté with ~$3 of ingredients.
5) Tuna

Background: Figured I'd use one of the more-traditional smoked fishes as well, so picked up a small steak.
Preparation: I sliced the steak in half, for smaller pieces, and used the same prep as the mackerel –
- Liberally sprinkle kosher salt onto plate
- Place steaks on plate
- Liberally sprinkle kosher salt on filets
- Let sit for 10-15 minutes
- Wash off salt with cold water, transfer to dry plate and pat dry
- When ready to smoke, transfer to large sheet of aluminum foil
- Place aluminum foil on grate of smoker, and smoke for ~2 hrs.
- Enjoy!
Verdict: Not bad, but not a runaway success. Came out a little dry – could definitely use a nice marinade to keep moisture in and add some other flavors.
6) Chicken Heart
Background: Well, there were giblets with the chicken, and I'm not one to waste food.
Preparation: Just put it on the aluminum foil, similar to the livers.
Verdict: Smoky! Very, very meaty and chewy. But, there's a reason you don't really see chicken hearts on menus most places.
...
So, all in all, an excellent start. Stay tuned for additional adventures in smoking, and if you've got wood or meat to devote to the cause, let me know!
Subscribe to:
Posts (Atom)

